News

Welcome to our Technical Information Pages!

Canon DSLR Auto Exposue Calibration Plugin

⬅️ Use browser back arrow to return to main menu.

Auto Exposure Plugin

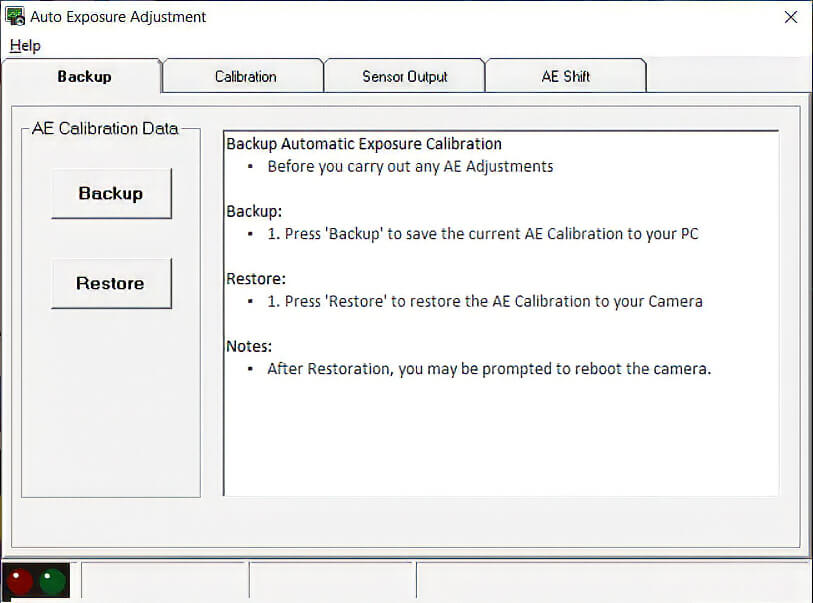
AE Data Backup & Restore

Protect the camera’s original calibration data before making any modifications
AE Data Backup Screen

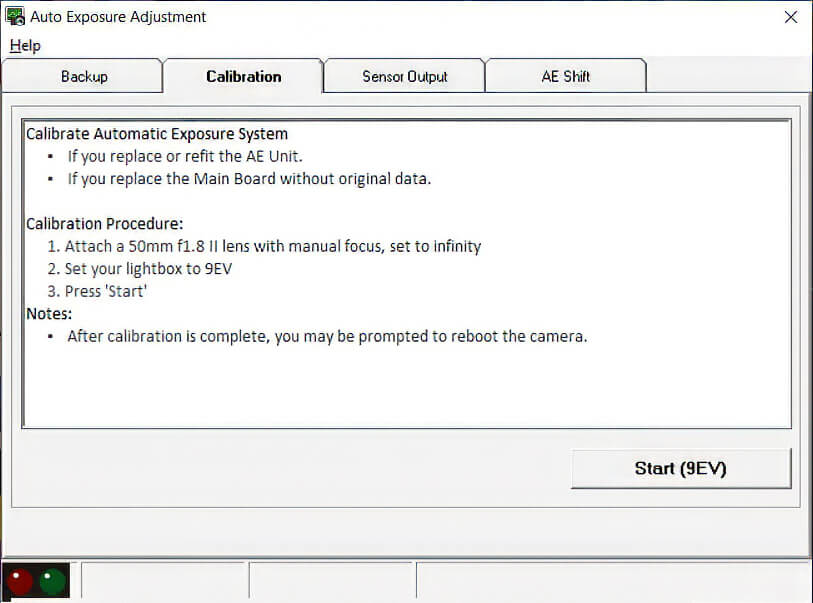
AE System Calibration

Adjust the Camera’s Lightmeter System
Calibration requires a 50mm f/1.8 lens and a calibrated lightbox set to EV9.
AE System Calibration Screen

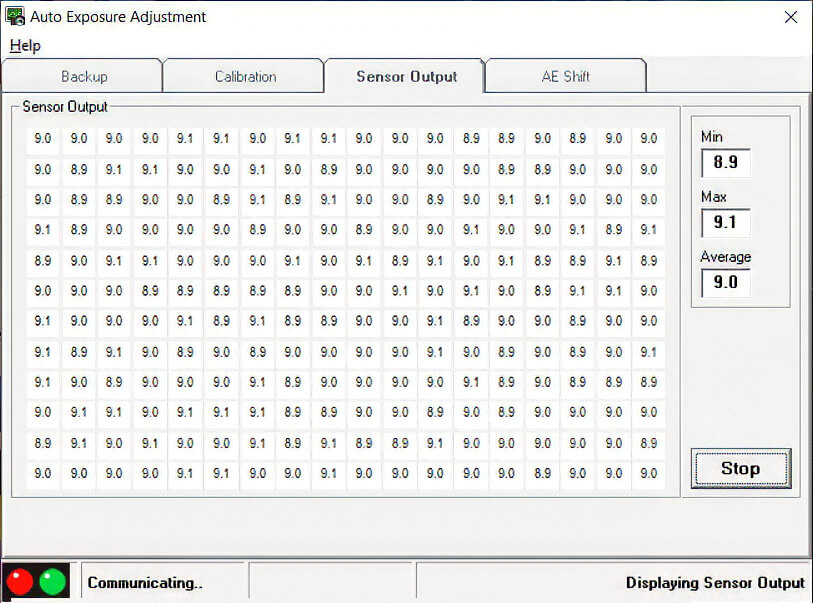
AE Sensor Output

Check Real-Time Sensor Output Across All Light Meter Cells
AE Sensor Output Screen
This window displays the raw exposure value for each individual AE sensor segment. The right data panel automatically calculates the minimum, maximum, and average readings to verify metering balance.

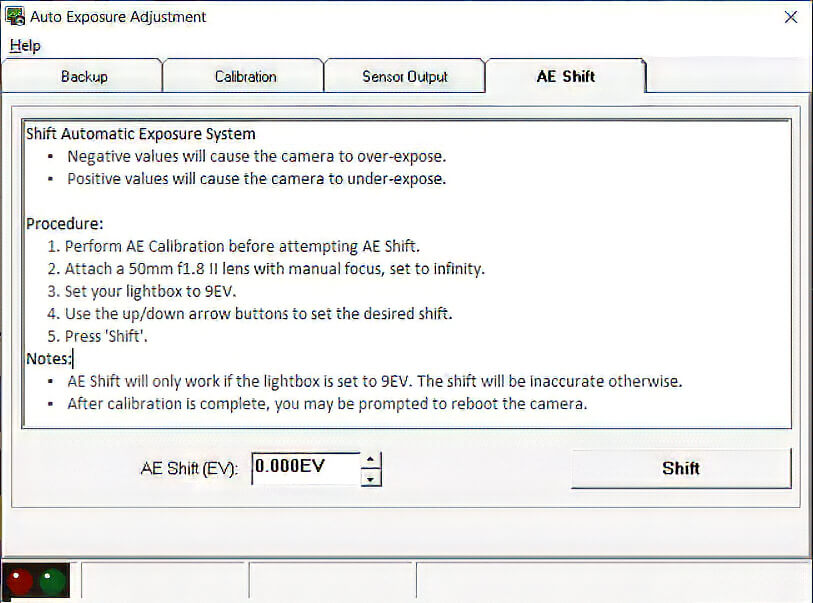
Manual AE Shift

Override Standard Auto-Exposure
This tab allows you to intentionally overexpose or underexpose the camera’s AE. Use this feature to compensate for non-standard focusing screens or to meet specific client requirements.
Manual AE Shift Screen
 

AF Sensor Output Testing using

Canon DSLR Auto Focus Plugin

⬅️ Use browser back arrow to return.
Canon DSLR Sensor Output Overview
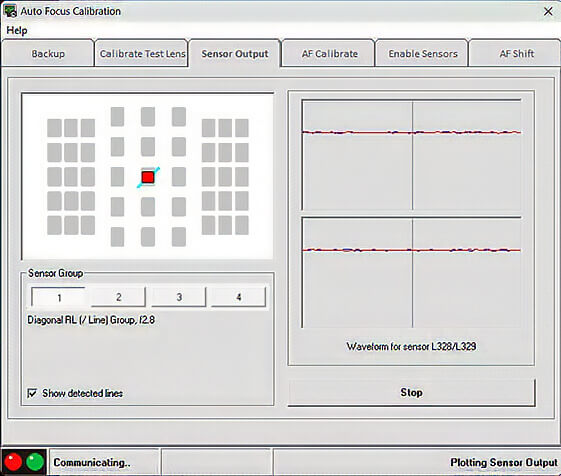
Testing your AF Sensors

The Sensor Output tab allows you to inspect the raw data from each AF sensor. This diagnostic view reveals physical dust contamination that blocks focus, verifies that the AF unit is perfectly aligned with the focusing screen, and confirms that all sensors are functioning correctly.

AF Sensor Troubleshooting
The AF Sensor tab is a dedicated diagnostic tool used to inspect autofocus sensors or encounter calibration failures. It displays live data readouts directly from the camera's sensor array, allowing you to instantly visually verify that individual sensors are active and working correctly.
 

Manual Auto Focus Calibration using

Canon DSLR Auto Focus Plugin

⬅️ Use browser back arrow to return.
Canon DSLR Manual Auto Focus Calibration Overview
Manual Auto Focus Adjustment

Our automatic calibration process handles most jobs and is the recommended default method!

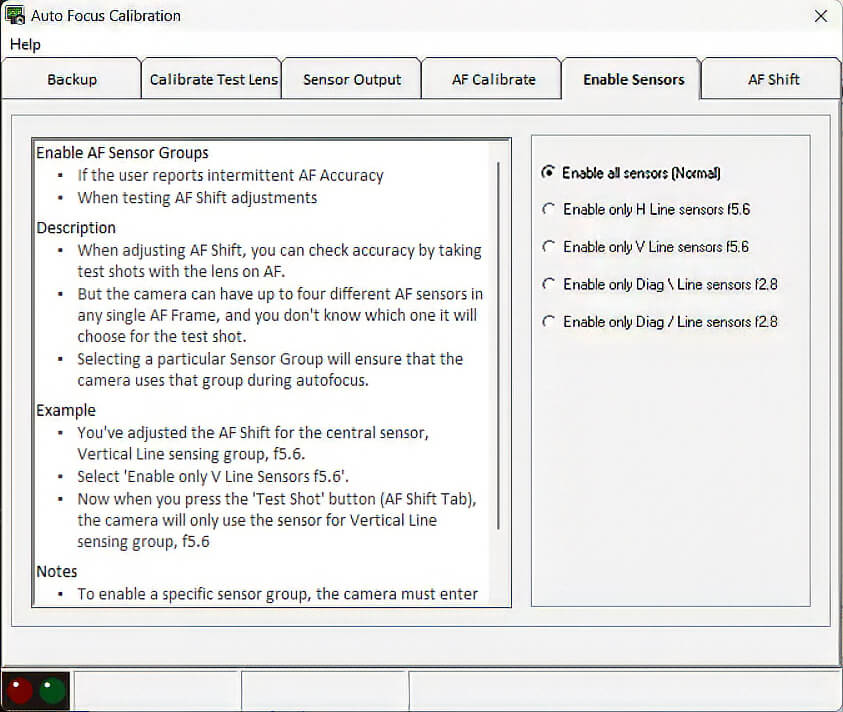
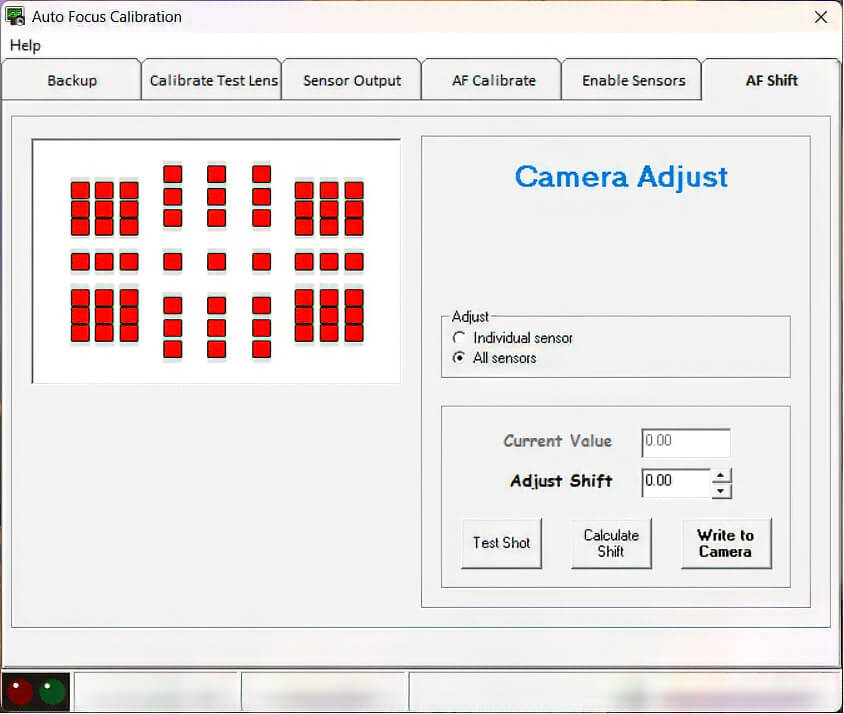
However, Technician preference or unique client requests — such as specific front/back shifts or Infrared (IR) conversions require manual AF Adjustment. For these advanced setups, you will use the Enable Sensors and AF Shift tabs in tandem to dial in the calibration.

Bench Tip: Until you are experienced with manual sensor-level calibration, we strongly recommend selecting "Enable all sensors (Normal)" in the Enable Sensors tab, and Adjust 'All sensors' in the AF Shift tab.

Enable Sensors (Requires Test Lens)

Manually AF Adjustments are normally reserved for special calibrations!
Select Enable all sensors (Normal) for standard repairs.
Click: "All sensors (Normal)". This locks all sensor groups simultaneously so you can adjust them globally inside the AF Shift tab.

Manual AF Adjustment — Part 2 (Requires Test Lens)

Use this tab to manually adjust AF shift values after enabling your sensors.
Reserve Manual AF Adjustments for Special Calibrations Only.
 

Creating A Test Lens

The Bench & Target Setup / Creating the Compensation File

⬅️ Use browser back arrow to return.

Tutorial Videos


Step A: Bench & Target Setup


Step B: Software Calibration

⬅️ Use browser back arrow to return from YouTube


Automatic Auto Focus Calibration using

Canon DSLR Auto Focus Plugin

⬅️ Use browser back arrow to return.
Canon DSLR Auto Focus Calibration Overview
Getting Started

Start by creating a Calibrated Test Lens. This gives you a hands-on introduction to the workflow, and this single lens can be used to service all Canon DSLR bodies. Use the software Help section to select a good test lens.

When performing a repair, use this fast two-step workflow:

  1. Backup Camera Data using the Backup tab.
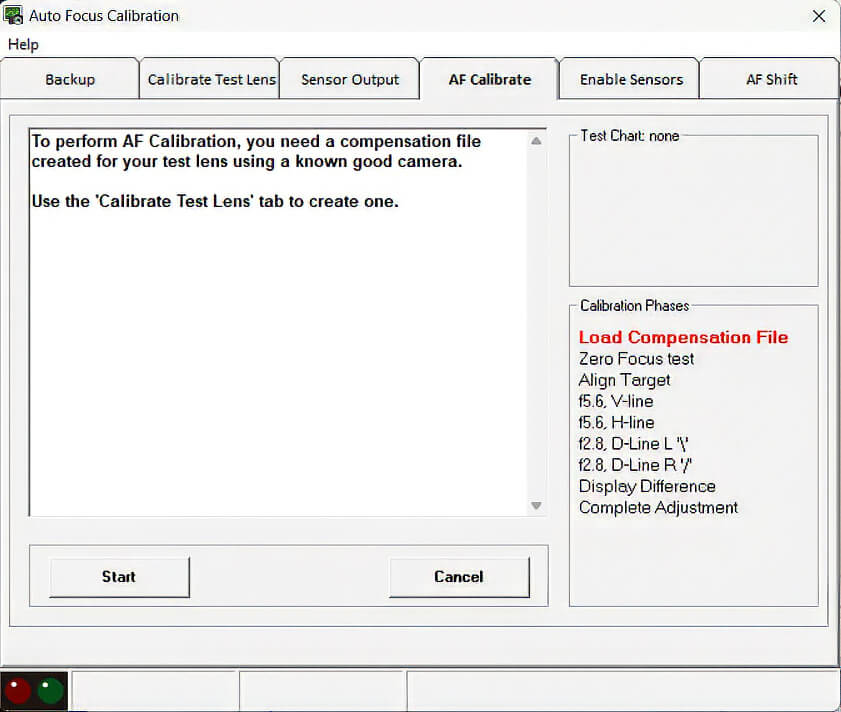
  2. Calibrate Auto Focus automatically using the AF Calibrate tab.

AF Data Backup & Restore

Protect the camera’s original calibration data before Making any modifications

Create a Test Lens

Create a calibrated Test Lens by building a custom compensation file.
Normally AF calibration requires an expensive, lab-grade lens. Our process creates a custom compensation file for a standard, high-quality lens; converting it into a precise Test Lens.
You can create as many Test Lenses as you want.

Automatic AF Calibration (Requires Test Lens)

Adjust your Camera Bodies AF Automatically
Cameras have hundreds of AF Sensors, so it is not practical to calibrate AF manually. SPT Software uses our Automatic AF Calibration process which can complete the job in minutes.
Load your saved Compensation File into your Test Lens. Then follow our step-by-step on-screen prompts to manually guide software as it adjusts the camera body.
 

Canon EOS DSLR Auto Focus Calibration Plugin

⬅️ Use browser back arrow to return.
Canon EOS Auto Focus Calibration Overview

Calibrate arrays Automatically or Manually. Always perform a backup first.

Auto: Create file once via Calibrate Test Lens, then calibrate bodies via AF Calibrate.
Manual: Check values in Sensor Output, then shift via Enable Sensors / AF Shift.

AF Data Backup & Restore

Goal: Protect original calibration data before making changes.

Save a complete backup of current AF data to your PC before altering parameters. Revert and restore original state instantly if needed.

One-Time Test Lens Setup (Automatic Method)

Goal: Create a master reference lens file for your bench.

Generate a compensation file for your dedicated shop test lens. Save multiple test lenses as required.


Canon EOS 90D Shutter Calibration & Count Reset Plugin

⬅️ Tip: Use your browser’s back arrow to return to the previous page anytime.
 
Click this tab bar to view each feature of the plugin
Shutter Timing
Calibrate your shutter without expensive test equipment

Fine-tune high shutter speeds using histograms — no costly test gear required.

The software guides you step-by-step, saving time and effort.

⚠️ For accurate results, use a calibrated light source like a lightbox.

X Contact Timing
Check and adjust X Contact Timing if needed
X Contact Timing
Shutter Count
Reset the current Shutter Count to '0' after a shutter replacement
Shutter Count

View and Change the Shutter Count and Previous Shutter.
You can read the Total Shutter Count.

Mirror Count
Reset the current Mirror Count to '0' after a mirror box replacement
Mirror Count

You can also reset the Previous Mirror Boxes and read the Total Mirror count.

Release Count
Changing the Count in the Camera's Menu
Release Count
This model’s software lets you reset the Release Count — essential when replacing the Main Board without original data.

⚠️ Looking to change the number displayed in the camera’s menu or in shutter-count apps? Both are actually the Release Count! You must change the RELEASE COUNT.

⬅️ Done? Use your browser’s back arrow to return.

```
 

Canon EOS DSLR Main Board Replacement Plugin

⬅️ Tip: Use your browser’s back arrow to return to the previous page anytime.


Click this tab bar to view each feature of the plugin.

Backup Calibration

Backup Data ... Your insurance against a Bad Board Swap!

This tab lets you save all of the camera’s original calibration files — a vital safety net before making changes or replacing boards.

Backup Calibration Screenshot

⚠️ Tip:  Even though you are planing to use the Main Board Replacement plugin,  save your Camera Data using the Calibration Tab first,  Here’s why …

With the Main Board Replacement Plugin, you can:

  • Replace the defective Board with a new Main Board
  • Use a Reliable used Main Board even if the original Calibration Data was not saved.

This Backup Calibration tab goes beyond the Calibration Data tab in Essential — it captures a more complete set of data, including files stored on other boards inside the camera.


⚠️ IMPORTANT: Canon OEM Battery Power Issue There are verified reports of new main boards failing to power up when using a Canon OEM battery. This issue does not occur with third-party/off-brand batteries.

⚠️  Users report having successfully installed calibration data from a similar model with good results. However, installing non-original calibration data is not fully tested. Proceed at your own discretion.


⚠️ Important: User Data must be saved and restored separately. User Settings are NOT part of Calibration Data or Backup Calibration.  


⬅️ Done? Use your browser’s back arrow to return.


The Canon EOS 90D Professional Advanced Software

Defaults and Geographical Plugin

⬅️ Tip: Use your browser’s back arrow to return to the previous page anytime.
Click this tab bar to view each feature of the plugin
Standard Defaults
Restore Factory Defaults, Avoid Calibration Conflicts, Prep the Camera for Resale ….

With Standard Defaults, you can:

  • Reset some or all settings back to Factory Defaults.
  • Eliminate Calibration conflicts by resetting User or Custom Functions to Factory Defaults.
  • Reset the camera’s language back to English if it defaults into Japanese.
  • Reset Factory Defaults for Resale, which also removes the Previous Owner’s Settings.

⚠️ Before resetting User and Custom functions to Factory Default, be sure to back up the customer’s setting using the User Tab in Essential.

Regional Defaults
Buy Main Boards Internationally—Shop for the Best Price and Availability
Regional Defaults

With Regional Defaults, you can:

  • Buy Main Boards globally without worrying about region-specific settings.
  • Quickly adjust your camera to match the correct settings for your country.

Regional Settings Include:

  • Video System (PAL/NTSC)
  • WiFi Configuration
  • User Language
  • Date Format

Whether servicing cameras, replacing parts, or preparing a camera for resale, the Defaults and Geographical Plugin makes the process quick and hassle-free.

⬅️ Done? Use your browser’s back arrow to return.


The Canon R6 Professional Advanced Software Temperature Plugin

⬅️ Tip: Use your browser’s back arrow to return to the previous page anytime.

Solve Hard-to-Diagnose Temperature Related Problems

With the Temperature Plugin, you can:

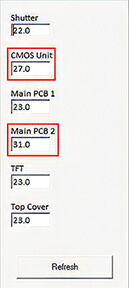
  1. Check and Test Key Sensors; on the Shutter, CMOS, Main PCB, and TFT Display and Top Cover.
  2. Eliminate guesswork when diagnosing temperature sensor issues.
  3. Quickly identify the source of temperature-related problems.
  4. Save time and minimize frustration during repairs.


Here are a few temperature-related issues

  • Soft focus on hot days – Caused by changes in Lens Flange/CMOS distance.
  • Random overexposure or underexposure – Due to fluctuations in AE current.
  • Dark images at high shutter speeds – Resulting from Shutter temperature changes.
  • Flash malfunctions – Triggered by temperature shifts in the EF unit.

⬅️ Done? Use your browser’s back arrow to return.


The Canon DSLR Professional Camera FAX

⬅️ Tip: Use your browser’s back arrow to return to the previous page anytime.


Before and After Service Reports for your Customers

Promote your business with your custom Headers and Footers


The Advanced Camera FAX includes the data from Essential and Professional plugins.


Professional Reporting & Revenue Growth

  • Create New Income: Offer the Camera FAX as a fast, standalone diagnostic service to generate extra revenue.
  • Build Customer Trust: Provide professional "Before and After" reports to prove your work and justify your repair costs.
  • Verify Market Origin: Instantly identify "Grey Market" imports to avoid warranty issues and illegal Wi-Fi frequencies.
  • Faster Estimates: Quickly access shutter counts and internal error logs for more accurate and profitable repair quotes.

⬅️ Done? Use your browser’s back arrow to return.


The Canon DSLR Advanced Camera FAX

⬅️ Tip: Use your browser’s back arrow to return to the previous page anytime.


Advanced Camera FAX

Before and After Service Reports for your Customers

Promote your business with your custom Headers and Footers


The Advanced Camera FAX includes the data from Essential, Professional and Advanced plugins.


Professional Reporting & Revenue Growth

  • Create New Income: Offer the Camera FAX as a fast, standalone diagnostic service to generate extra revenue.
  • Build Customer Trust: Provide professional "Before and After" reports to prove your work and justify your repair costs.
  • Verify Market Origin: Instantly identify "Grey Market" imports to avoid warranty issues and illegal Wi-Fi frequencies.
  • Faster Estimates: Quickly access shutter counts and internal error logs for more accurate and profitable repair quotes.

⬅️ Done? Use your browser’s back arrow to return.


The Canon DSLR Software User Setting Data Tab

⬅️ Tip: Use your browser’s back arrow to return to the previous page anytime.


User Settings

Backup and Restore Your Customer’s Settings Quickly


With the User Settings Tab, you can:

  • Save time by saving the owner's custom modes and video preset settings. No User Setting is overlooked.
  • Quickly restore the camera to the owner’s preferences using the saved User files, with only the date excluded.
  • For Professional Advanced owners, this feature also helps prevent calibration conflicts when combined with the Standard Defaults Tab (included in the Defaults and Geographical Plugin).


⚠️ Important:  User Settings  must be saved and restored separately. User Settings are NOT part of Calibration Data or Backup Calibration.  


This feature streamlines repairs, helping you work more efficiently while boosting your productivity and profitability. 


⬅️ Done? Use your browser’s back arrow to return.


The Canon DSLR Software Calibration Data Tab

⬅️ Tip: Use your browser’s back arrow to return to the previous page anytime.


Calibration Data

Save & Restore Camera Calibration Settings

⚠️ Tip:  Save your Camera Data using this Calibration Tab first, even if you are planning to use the Main Board Replacement plugin.  Here’s why …

With the Calibration Data Tab, you can:

  1. Replace the Main Board with a reliable Used board, if you were able to save the original Calibration data.
  2. Save the calibration data before making adjustments, so you can quickly restore the camera’s original settings if needed.


⚠️  If you CAN NOT save the Original Camera Data or are installing a New Main Board, you will need to use the more extensive Main Board Replacement Plugin.


⚠️ Important:  User Settings must be saved separately. User Settings are NOT part of  Calibration Data or Backup Calibration .


The software makes it simple … just follow the directions and prompts


The Canon DSLR Software Error Code Tab

⬅️ Tip: Use your browser’s back arrow to return to the previous page anytime.


Error Codes

Troubleshoot both Static and Intermittent Problems .. Fast!

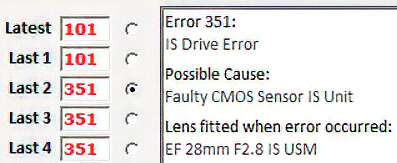
With Internal Error Code, you can Troubleshoot using the following tools:

  1. The Last 8 Internal Error Code – The specific code for each error.
  2. The Probable Cause – A likely explanation for the error.
  3. The Lens on the Camera – Which lens was attached when the error occurred.
  4. The Date of the Error – When the problem happened.
  5. The Release Count at the Time of the Error – The camera’s usage count when the error occurred.
  6. Clear the Error Codes - after you complete your repair. 

The Internal Error Code Tab is a powerful tool that will save you time and frustration, even with hard-to-pin-down intermittent problems. 


When paired with Camera FAX, the Before and After Report becomes a powerful sales tool, highlighting the results of your work and building customer trust.


⬅️ Done? Use your browser’s back arrow to return.


Canon Mirrorless Error Code Diagnostics & Camera FAX Reports

⬅️ Tip: Use your browser’s back arrow to return to the previous page anytime.


The Fast and Simple Way to Troubleshoot

Both Static and Intermittent Problems

With Internal Error Code, you can Troubleshoot using the following tools:

  1. The Last 8 Internal Error Code – The specific code for each error.
  2. The Probable Cause – A likely explanation for the error.
  3. The Lens on the Camera – Which lens was attached when the error occurred.
  4. The Date of the Error – When the problem happened.
  5. The Release Count at the Time of the Error – The camera’s usage count when the error occurred.
  6. Clear the Error Codes - after you complete your repair. 

The Internal Error Code Tab is a powerful tool that will save you time and frustration, even with hard-to-pin-down intermittent problems. 


When paired with Camera FAX, the Before and After Report becomes a powerful sales tool, highlighting the results of your work and building customer trust.


⬅️ Done? Use your browser’s back arrow to return.


Compatible Cameras for Canon Lens Professional Software

⬅️ Tip: Use your browser’s back arrow to return to the previous page anytime.


Your compatible camera serves as a Test Body for your Lens Professional Software!

  • You only need one Test Body to calibrate all your Canon lenses.
  • The only requirement is that the Test Body has accurate and reliable autofocus.
  • Lens adjustments made using the Test Body applies to all camera bodies.
  • The software also lets you specify the autofocus (AF) system used by each lens.


Comparable Camera List

  • EOS  1DX
  • EOS  1DX Mark II
  • EOS  5D Mark III
  • EOS  6D
  • EOS  6D Mark II
  • EOS  7D Mark II
  • EOS  70D
  • EOS  77D, 9000D
  • EOS  80D
  • EOS  100D, Rebel SL1, Kiss X7
  • EOS  200D, Rebel SL2, Kiss X9
  • EOS  650D, Rebel T4i, Kiss X6i
  • EOS  700D, Rebel T5i, Kiss X8i
  • EOS  760D, Rebel T6s, 8000D
  • EOS  800D, Rebel T7i, Kiss X9i